Showing posts with label Debian. Show all posts

Tuesday, 7 August 2012

Sakai Development: Post Four

Time to do some work sorting out the problems. It's fairly clear that at least some of them stem from difficulties with the sakai.properties file, which seems to have been ignored during compilation: hence the title for the page of "LocalSakaiName : Gateway : Welcome" rather than what I set in the properties file. Unfortunately, this suggests that another re-compilation will need to be carried out. So the first investigation is to try and work out why the properties file was ignored. In fact, this looks to be fairly simple, and is due to a mis-reading of the installation instructions. I assumed that a sakai.properties file should reside in the directory where the sample properties files are kept, and then copied to $CATALINA_HOME/sakai after the installation is complete. In fact, I should have started by creating the sakai directory and putting the file in it before beginning the compilation. So here we go again...

OK, forty five minutes later, we have recreated Sakai. Unfortunately, putting the file in the sakai directory makes absolutely no difference to the web page which is seen at the end of the process. However, touching the file

$ touch /usr/local/tomcat/sakai/sakai.properties

(which changes its last update time to the present), then stopping and starting tomcat fixes the name of the web page. In the process, I learn that restarting Sakai takes a very long time - it's a couple of minutes before it becomes available again through apache and tomcat. Hopefully, though, we can continue to fix problems in this way. The first issue to fix is the location of the stylesheet, which is in the page as a relative link "/portal/styles/portalstyles.css" when it should be "/sakai/portal/styles/portalstyles.css". Clearly, the value put in the sakai.properties file for portalPath, which I expected to sort this out, is not having the intended purpose. So I'll need to experiment.

Changing skin.repo to /sakai/library/skin means that the stylesheet is found, and the page suddenly looks like a modern web page rather than a relic from 1994. There are still missing graphics, so I went back to the properties file and changed every URL to add /sakai at the beginning - with the result that just about everything was found OK. On the main page, the following still are wrong: /portal/styles/portalstyles.css/library/js/headscripts.js/library/js/jquery.js, portal/styles/images/transMin.png/portal/site/!gateway/page/!gateway-200 (and the same, ending 300, 400, 500, 600 and 700), /library/image/transparent.gif/library/editor/FCKeditor/fckeditor.js and /library/editor/fckeditor.launch.js. The most serious consequence of this is that all the links down the left hand side, which seem to be the main navigation routes, are broken. Searching the various pieces of documentation for "gateway" does not find anything helpful.

This means that it's probably time to rethink my methodology here. I want to host several applications (and some stand-alone web pages) on this virtual machine. I can't without considerable effort (in getting institutional firewall rules changed) have web services accessible on ports other than 80 and 443, so forwarding based on port number is not an option. This leaves either the use of multiple VMs, which seems a little wasteful, or the use of URL prefixes such as /sakai to distinguish between the applications on the machine. But if Sakai is unwilling to play nicely with others, this is going to be difficult to do, especially as I already know that one of the other applications I want to use (EPrints) has been prone to do likewise in past releases, with an installation process which overwrites and hijacks the global web server configuration. So the question is, can I do something clever in the apache proxy configuration which will sort things out so I can just have / go to Sakai, but have other configurations which deal with (say) /html or /eprints before the global forwarding rule is reached? It's not something I've ever needed to do before, but it is clear from apache's documentation that the sensible processing method is used: rules are checked in the order they appear in the configuration file. The static pages will also need to be handled differently, however. (It might be possible to effectively host them on Sakai, though.) The use of proxying will become complicated if I end up installing a second application which uses tomcat, though I could probably cope by adding a new listener to the tomcat configuration and sending the proxy to that. In the end, this is all sounding like a good idea, so I need to check out the apache configuration again. And think about how best to do it.

(After some thought, and browsing to find possible solutions...)

It turns out that there are various apache modules which are touted online as methods to solve this problem - mod_html_proxy, mod_substitute, and mod_rewrite. Not all of them seem to work in this situation, and there are issues (they are not keen to change "/" to "/sakai/" globally, especially). In the end, the approach which worked was this. First, enable mod_substitute by creating a link in /etc/apache-2/mods-enabled to the appropriate file in /etc/apache2/mods-available:

$ cd /etc/apache2/mods-enabled
$ ln -s ../mods-available/substitute.load .

Then configure it. In the apache configuration, replace the previous proxy configuration with:

ProxyPass /sakai/ ajp://localhost:8009/
ProxyHTMLURLMap /sakai/ ajp://localhost:8009/
ProxyPassReverse  http://localhost:8009/ /sakai/
AddOutputFilterByType SUBSTITUTE text/html
Substitute s#([^i])/portal/tool/#$1/sakai/portal/tool/#i
Substitute s#([^i])/portal/#$1/sakai/portal/#i
Substitute s#([^i])/library/#$1/sakai/library/#i
Substitute s#([^i])/access/#$1/sakai/access/#i

The rules basically pub /sakai/ before the three prefixes for sakai URLs unless they already follow /sakai (in a slightly simple-minded way, but I can make the rules more sophisticated later if it turns out to be necessary). The extra rule for /portal/tool turns out to be needed, because the URLs aren't correctly handled by apache otherwise, for some reason. It should be noted that because apache now runs through every http response it proxies from tomcat to find instances of these URLs, a performance hit will have to be taken, which may make these changes inappropriate in a production environment - though it should be possible to run a production environment on a server of its own or at least in a separate apache virtual host with its own domain name anyway.

Restart apache.

$ sudo /etc/init.d/apache2 reload

Then undo all the changes to sakai.properties which added /sakai to the beginning of URLs, and restart tomcat. And we have:


And now it is possible to register as a user, and start getting something useful done.

Tuesday, 31 July 2012

Sakai Development: Post Three

At this point we can start to install Sakai itself. I decided to start with the source archive, mainly because I don't really want to have to debug any serious issues with the development source code. Because of the restrictions on my VM, I saved http://source.sakaiproject.org/release/2.8.2/artifacts/sakai-src-2.8.2.tar.gz to my desktop and then used scp to copy it to the server. I now have sakai-src-2.8.2.tar.gz in my home directory.

Once the source is downloaded, the first new step is to set up some environment variables. The instructions say that the java executables (java, javac, etc.) need to be in the path; in fact, the way that Java is set up on Debian makes this unnecessary, as /usr/bin/java (etc.) are symbolic links to the java executables, which do not need themselves to be in the path. Some work is needed, though; to increase the memory available to Sakai, create the file /usr/local/tomcat/bin/setenv.sh with the contents:

export JAVA_OPTS='-server -Xms512m -Xmx1024m -XX:PermSize=128m -XX:MaxPermSize=512m -XX:NewSize=192m -XX:MaxNewSize=384m -Djava.awt.headless=true -Dhttp.agent=Sakai -Dorg.apache.jasper.compiler.Parser.STRICT_QUOTE_ESCAPING=false -Dsun.lang.ClassLoader.allowArraySyntax=true'

Make the new file executable:

$ sudo chmod a+x /usr/local/tomcat/bin/setenv.sh

The required version of subversion is already installed.

Next, install maven 2.2. This is the version of maven in the Debian software repositories as maven2, but this is a package which has a very large number of dependencies, some of which will clash with the already installed Sun java (openjdk, for one). Although java binaries and compilation is supposed to be compatible across the different implementations, it feels wrong to use this maven - and having multiple java implementations on the server when its not necessary seems silly, a recipe for confusion later on. It makes me feel happier to install maven by downloading from apache. (Though in the end, for the sake of time, I chose to download the binary, with no idea about which java was used to compile it...) The installation process is basically the same as that for tomcat.

$ sudo mv apache-maven-2.2.1-bin.tar.gz /usr/local
$ cd /usr/local
$ sudo tar zxvf apache-maven-2.2.1-bin.tar.gz
$ sudo ln -s apache-maven-2.2.1 maven

maven needs some setting up, and I choose to do this globally, so that every new session picks up the home and options for maven. In /etc/bash.bashrc, add the lines:

MAVEN_HOME=/usr/local/maven

export MAVEN_OPTS='-Xms512m -Xmx1024m -XX:PermSize=64m -XX:MaxPermSize=128m'
PATH=$PATH:$JAVA_HOME/bin:$CATALINA_HOME/bin:$MAVEN_HOME/bin
export JAVA_HOME CATALINA_HOME MAVEN_HOME PATH

at the end of the file (the last two lines replacing the ones given in the previous post). To do the same things for a single user, add settings to .profile in the home directory. When this has been done, run

$ source /etc/bash.bashrc

to import these settings into the current session and then test to be sure that this all worked:

$ mvn --version

Apache Maven 2.2.1 (r801777; 2009-08-06 20:16:01+0100)
Java version: 1.6.0_26
Java home: /usr/lib/jvm/java-6-sun-1.6.0.26/jre
Default locale: en_GB, platform encoding: UTF-8
OS name: "linux" version: "2.6.32-5-amd64" arch: "amd64" Family: "unix"

Create a local maven repository directory:

$ cd $HOME
$ mkdir -p .m2/repository


and add a settings file to the m2 directory also created by this command, as .m2/settings.xml, containing:


Additional information may need to be added if the server uses a proxy to communicate to the Internet, as maven doesn't check the http_proxy system variable (but go here rather than trying to follow the instructions in the Sakai guide to add the instructions to the settings.xml file). The instructions now tell you to configure Sakai, which is confusing as Sakai has not yet been installed (and the instructions tell the installer to edit as yet non-existent files). There is a minor step missing from the instructions, which is to open the archive of the Sakai source code already downloaded. In the user's home directory,

$ tar zxvf sakai-src-2.8.2.tar.gz
$ cd sakai-src-2.8.2

Next, set up the mysql database to use. The right JDBC driver for the database you intend to use needs to be downloaded and put into /usr/local/tomcat/shared/lib; for mysql, this is available from http://www.mysql.com/products/connector/. The database will also need to be set up as per the configuration entries you set up. For mysql this entails the following activities (with some parts of the server response omitted, and the actual password I used replaced by the word "password"):


$ mysql -u root --password
Enter password: 
Welcome to the MySQL monitor.  Commands end with ; or \g.

Copyright (c) 2000, 2011, Oracle and/or its affiliates. All rights reserved.

Oracle is a registered trademark of Oracle Corporation and/or its
affiliates. Other names may be trademarks of their respective
owners.

mysql> create database sakai;
Query OK, 1 row affected (0.00 sec)
mysql>  grant usage on *.* to sakai@localhost identified by 'password';Query OK, 0 rows affected (0.00 sec)
mysql> grant all privileges on sakai.* to sakai@localhost;
Query OK, 0 rows affected (0.00 sec)
mysql> exit;
Bye

Note that I had already set a root password; often, new installations of mysql do not have the password set. To test this worked, I then ran:

$ mysql -u sakai -p 'password' sakai
mysql>; exit
Bye

Now it's possible to carry out some pre-compilation configuration. First, make a new properties file to configure the compilation-time information, such as the server domain name; I felt that the best start was with a copy of the existing exemplar, default.sakai.properties. There is also a file, sample.sakai.properties, which contains all the many possible items it is possible to configure at this point - since the default.sakai.properties file is already 924 lines long, to work through the longer file was a job I hoped would be unnecessary.


$ cd config/configuration/bundles/src/bundle/org/sakaiproject/config/bundle
$ cp default.sakai.properties sakai.properties

Then edit the new sakai.properties. Most of these changes from the default were because I decided to forward only access requests for /portal from apache to the tomcat listener, and so the URLs for navigation all need to start /portal. My expectation at this point is that the changes I make won't matter - they all seem to be in the nature of the sort of local customisation which should easily be changeable later (and, if not, I can always change the properties and compile again).. The contents of a sakai.properties file are documented in a 90 page Microsoft Word file found at sakai-src-2.8.2/reference/docs/architecture/sakai_properties.doc - useful, if a bizarre choice for a documentation format for an open source project. To summarise the main points, as relevant to the compilation I want to carry out:


  • The edited file should end up at /usr/local/tomcat/sakai/sakai.properties, and further changes can indeed be made later. The compilation process does not copy this file across, so it will need to be sorted out by hand. One of the consequences of not doing this is that Sakai will attempt to use the default hsqldb database, which has not been installed, and this will prevent the installation from working (the error in this case, which appears in catalina.out, is "java.sql.SQLException: Table not found in statement [select COUNT(*) from SAKAI_SESSION]").
  • The connection details for the database to use need to be set up, and the existing hsqldb values commented out.
  • The property portalPath is used for adding a pathway to the URL (which should not be used to contain the full path to the portal where there is some extra needed, as here where URLs ending /sakai are forwarded to tomcat); this is not in the default properties file.
Now comes the first moment of truth: compilation. The first stage of this is to compile the master project for Sakai.

$ cd ~/sakai-src-2.8.2/master
$ mvn clean install

This is followed by a lengthy list of missing libraries, followed by downloads and installation of these libraries - which is far nicer than having to fulfil all the dependences by hand. Eventually, there is the magic message:


[INFO] [install:install {execution: default-install}]
[INFO] Installing /home/sjm62/sakai-src-2.8.2/master/pom.xml to /home/sjm62/.m2/repository/org/sakaiproject/master/2.8.2/master-2.8.2.pom
[INFO] ------------------------------------------------------------------------
[INFO] BUILD SUCCESSFUL
[INFO] ------------------------------------------------------------------------
[INFO] Total time: 1 minute 14 seconds
[INFO] Finished at: Wed Jul 18 14:15:09 BST 2012
[INFO] Final Memory: 16M/495M
[INFO] ------------------------------------------------------------------------

Then, the actual compilation and deployment to tomcat of Sakai itself. I'm aiming to compile the cafe build, recommended for new developers.

$ cd ~/sakai-src-2.8.2
$ mvn -Pcafe clean install sakai:deploy -Dmaven.tomcat.home=/usr/local/tomcat

I set this going and then immediately realised that I don't have write permission to /usr/local/tomcat. As expected, this ends with

[INFO] [sakai:deploy {execution: default-cli}]
[INFO] Copy /home/sjm62/.m2/repository/javax/servlet/jstl/1.1.2/jstl-1.1.2.jar to /usr/local/tomcat/shared/lib/jstl-1.1.2.jar
[INFO] ------------------------------------------------------------------------
[ERROR] BUILD FAILURE
[INFO] ------------------------------------------------------------------------
[INFO] Fialed to deploy to container :/usr/local/tomcat/shared/lib/jstl-1.1.2.jar (Permission denied)
[INFO] ------------------------------------------------------------------------
[INFO] For more information, run Maven with the -e switch
[INFO] ------------------------------------------------------------------------
[INFO] Total time: 6 minutes 36 seconds
[INFO] Finished at: Wed Jul 18 14:26:33 BST 2012
[INFO] Final Memory: 76M/495M
[INFO] ------------------------------------------------------------------------

What doesn't occur to me at this point is that the quick way to fix this problem is to give myself write permission to /usr/local/tomcat and its sub-directories, at least temporarily. Instead, I try using sudo to allow the installation to occur.

$ sudo mvn clean install sakai:deploy -Dmaven.tomcat.home=/usr/local/tomcat

Predictably, this also fails (the reason being that I created the sakai environment in  /home/sjm62/.m2, so if I run the command as sudo, the information fails to be found). So now try:

$ sudo mvn -s /home/sjm62/.m2/settings.xml clean install sakai:deploy -Dmaven.tomcat.home=/usr/local/tomcat

This seems to work better, though I'm not at all sure what it might be doing to the ownership and permissions in ~/.m2. Download checksums failed for a fair number of the required resources, with no obvious effect (It looks from this as though the checksum of the downloaded file is compared to the stored checksum, but all that happens if they are different is that a warning is given, but the downloaded file is used anyway.) After twenty minutes downloading and compilation, this happens:

[INFO] [compiler:compile {execution: default-compile}]
[INFO] Compiling 9 source files to /home/sjm62/sakai-src-2.8.2/osp/wizard/tool/target/classes
[INFO] ------------------------------------------------------------------------
[ERROR] BUILD FAILURE
[INFO] ------------------------------------------------------------------------
[INFO] Compilation failure
Failure executing javac, but could not parse the error:

The system is out of resources.
Consult the following stack trace for details.
java.lang.OutOfMemoryError: PermGen space
at java.lang.ClassLoader.defineClass1(Native Method)
at java.lang.ClassLoader.defineClassCond(ClassLoader.java:631)
...
(tedious details omitted)
...
[INFO] ------------------------------------------------------------------------
[INFO] For more information, run Maven with the -e switch
[INFO] ------------------------------------------------------------------------
[INFO] Total time: 18 minutes 30 seconds
[INFO] Finished at: Wed Jul 18 15:01:39 BST 2012
[INFO] Final Memory: 102M/243M
[INFO] ------------------------------------------------------------------------

This suggests that the maven options set the memory size too low, even though I used the values from the documentation. I doubled the values, and ran the compilation again, with the same result. (It's very frustrating to have the compilation run for almost twenty minutes, then run out of memory.) It looks as though more thought is needed - perhaps the virtual machine has too little memory. Indeed, with no interactive processes running, the machine has 584 Mb used out of a total of 1002 Mb available of virtual memory: so setting the maximum memory usage of maven above 512 Mb will be pointless (the information comes from running free -m). According to top, the most memory intensive process running is tomcat, so I now propose to run the compilation once more, with tomcat shut down (must remember to restart it later...). This time I will also monitor the memory usage in another shell, using top and also running tail -f /var/log/messages, which should indicate problems if the machine's memory is full (the page at http://rimuhosting.com/howto/memory.jsp is a very helpful introduction to the diagnosis of linux memory issues, BTW). There is no obvious message, though it is possible that

Jul 19 09:56:48 float mpt-statusd: detected non-optimal RAID status

is connected, as Linux memory usage is increased by the caching of disk blocks in spare memory. (I would expect Linux memory management to be sophisticated enough to stop caching the blocks at pretty short notice when an interactive process wants the memory, however.) So my conclusion now is - I should increase the memory allocation for maven and try again. This time, MAVEN_OPTS is set to "-Xms1024m -Xmx2048m -XX:PermSize=1024m -XX:MaxPermSize=2048m" - and the build still fails. It's time to hit the Sakai dev mailing list. Posting at 1.45AM Pacific time unfortunately makes it likely I'll need to wait for an answer - so I'll do something else for a while. The answer comes fairly quickly, but apart from fixing obvious typos, leads to circling round whether or not I should be using root or sudo or neither. (Note: I can't just create new users on this VM in the obvious way, because it's set up to use an LDAP server for authentication, requiring userIDs other than root to match ones on the LDAP. There's probably a way round this, but it's not worth the time to sort it out, I don't think.) Also, the suggestion that tomcat needs to be run as a non-root user is something I thought about, but then didn't do, as apache's tomcat documentation says that there shouldn't be issues. (And applications writing to files outside the tomcat tree seems to me to be the application's security problem not tomcat's - especially as it's not likely to be possible if selinux is enabled...)


Anyway, self-justification apart, the solution is to get more memory for the virtual machine. Even with 2Gb virtual memory, the compilation process takes up 90% of it, so it is clear that the maven options suggested in the documentation are rather on the low side of what is needed, at least on Debian. But with the upgrade and write permission to /usr/local/tomcat, the compilation now runs to a successful conclusion:


$ ls /usr/local/tomcat/webapps/
access.war         profile2-tool.war  sakai-rutgers-linktool.war
accountvalidator        profile-tool   sakai-rwiki-tool.war
accountvalidator.war        profile-tool.war   sakai-search-tool
authn.war         providers   sakai-search-tool.war
balancer         providers.war   sakai-sections-tool.war
courier.war         ROOT    sakai-siteassociation-tool.war
dav.war          sakai-alias-tool.war  sakai-site-manage-group-helper.war
direct          sakai-announcement-tool.war sakai-site-manage-group-section-role-helper.war
direct.war         sakai-archive-tool.war  sakai-site-manage-link-helper.war
emailtemplateservice-tool      sakai-assignment-tool.war sakai-site-manage-participant-helper.war
emailtemplateservice-tool.war  sakai-authz-tool.war  sakai-site-manage-tool.war
imsblis          sakai-axis   sakai-site-pageorder-helper.war
imsblis.war         sakai-axis.war   sakai-site-tool.war
imsblti          sakai-calendar-summary-tool.war sakai-syllabus-tool.war
imsblti.war         sakai-calendar-tool.war  sakai-tool-tool-su.war
jsf-resource         sakai-chat-tool.war  sakai-usermembership-tool.war
jsf-resource.war        sakai-citations-tool.war  sakai-user-tool-admin-prefs.war
jsp-examples         sakai-content-tool.war  sakai-user-tool-prefs.war
library.war         sakai-editor.war   sakai-user-tool.war
login-render.war        sakai-fck-connector.war  sakai-web-tool.war
messageforums-tool        sakai-gradebook-testservice.war samigo-app
messageforums-tool.war        sakai-gradebook-tool.war  samigo-app.war
osp-common-tool.war        sakai-help-tool.war  savecite.war
osp-glossary-tool.war        sakai-login-tool.war  scheduler-tool
osp-jsf-example.war        sakai-mailarchive-james.war scheduler-tool.war
osp-jsf-resource.war        sakai-mailarchive-tool.war servlets-examples
osp-matrix-tool.war        sakai-memory-tool.war  sitestats-tool
osp-portal-tool.war        sakai-message-tool.war  sitestats-tool.war
osp-portal.war         sakai-metaobj-tool.war  tomcat-docs
osp-presentation-tool.war      sakai-news-tool.war  tool.war
osp-wizard-tool.war        sakai-podcasts.war  webdav
podcasts.war         sakai-postem-tool.war  web.war
polls-tool         sakai-presence-tool.war  wiki.war
polls-tool.war         sakai-reset-pass   x
portal-render.war        sakai-reset-pass.war  xsl-portal.war
portal.war         sakai-rights-tool.war  x.war
profile2-tool         sakai-roster-tool.war

Now on to the final stage of getting Sakai up and running. Restart tomcat:

$ sudo /usr/local/tomcat/bin/startup.sh 
[sudo] password for sjm62: 
Using CATALINA_BASE:   /usr/local/tomcat
Using CATALINA_HOME:   /usr/local/tomcat
Using CATALINA_TMPDIR: /usr/local/tomcat/temp
Using JRE_HOME:        /usr/lib/jvm/java-6-sun/
Using CLASSPATH:       /usr/local/tomcat/bin/bootstrap.jar

and then it should be visible in the web browser. However, it isn't, and there are large numbers of errors in the tomcat logs.

I found that recompiling and installing over an existing, failed, sakai build caused huge numbers of problems in tomcat (the re-installed version is basically missing libraries which installed fine the first time around, even if it does have some which were originally missing). This seems to be the problem discussed in http://collab.sakaiproject.org/pipermail/sakai-dev/2009-August/002909.html and the solution is to re-install tomcat completely and remove the existing maven project in .m2/repository/org/sakaiproject directory. However, even then I was still getting errors like the following (note that the full error only appears in the localhost.[date].log file, not in catalina.out, which has an exceptionally unhelpful short version of the first line only):

SEVERE: Error configuring application listener of class org.sakaiproject.util.ToolListener
java.lang.ClassNotFoundException: org.sakaiproject.util.ToolListener
        at org.apache.catalina.loader.WebappClassLoader.loadClass(WebappClassLoader.java:1438)
        at org.apache.catalina.loader.WebappClassLoader.loadClass(WebappClassLoader.java:1284)
(etc.)
(This particular error is repeated a large number of times, presumably once for each time a servlet tries to load the class.) I'm not sure what the cause is - permissions, or not removing enough of failed installations, perhaps - but it's fixed by getting rid of the entire sakai and tomcat installation and starting again from scratch. Once I remember to:

  • ensure that CATALINA_HOME is correctly set;
  • copy the setenv.sh file to $CATALINA_HOME/bin;
  • copy the mysql JDBC driver JAR file to $CATALINA_HOME/shared/lib;
  • copy the sakai.settings file to $CATALINA_HOME/sakai;
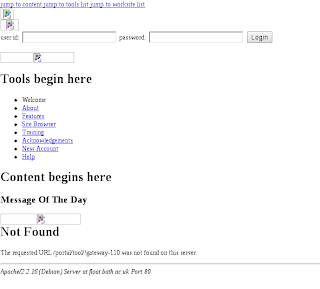
then I end up having an installation I can see from a web browser. There are obviously still some fairly serious problems, as can be seen from the screenshot to the right, but I feel that I'm starting to get somewhere.

Wednesday, 18 July 2012

Sakai Development: Post Two

The virtual host is now operational, so it is time to start setting up the environment for installing the Sakai CLE (2.8.2) from source. The machine is running debian 6.0.5.

In the past, I haven't generally installed java and tomcat on linux machines in the standard ways, because when I started doing that, the easiest way to do the installs was to download the packages and install in /usr/local, setting up symlinks where necessary. But now I think would be a good time to start doing things the standard ways, which should in 2012 be much better than they were in 1998. At least, I hope so!

Note that I am doing all this using sudo. It is not always installed on debian systems, and you may prefer to do this as the root user.

Preferred versions of java and tomcat are Oracle's Sun java SE 6 (the JDK) and apache tomcat 5.5.35 respectively (even though end of life for 5.5.35 is September 2012). So to start with, install java from the debian packages, following the useful instructions at http://www.thegeekstuff.com/2009/09/how-to-install-java-on-ubunt-debiau/:

sudo apt-get install sun-java6-jdk
Reading package lists... Done
Building dependency tree      
Reading state information... Done
Package sun-java6-jdk is not available, but is referred to by another package.
This may mean that the package is missing, has been obsoleted, or
is only available from another source

E: Package 'sun-java6-jdk' has no installation candidate

Looks as though the repository which contains sun-java6-jdk is missing. It's in the non-free repository, which can be added by adding "non-free" at the end of the first two uncommented lines in /etc/apt/sources.list:

deb http://ftp.uk.debian.org/debian squeeze main non-free
deb-src http://ftp.uk.debian.org/debian squeeze main non-free

(I used vi to do this.) Then update the list of packages:


$ sudo apt-get update
$ sudo apt-get install sun-java6-jdk

and indicate acceptance of the license which is displayed (press tab to select, return to activate it) - you should have to do this for two different screens. Check that this is now working, with:

$ java -version
java version "1.6.0_26"
Java(TM) SE Runtime Environment (build 1.6.0_26-b03)
Java HotSpot(TM) 64-Bit Server VM (build 20.1-b02, mixed mode)

Success. Now set up the environment variables for to enable tomcat to find this java when started using sudo. Edit /etc/bash.bashrc and add

JAVA_HOME=/usr/lib/jvm/java-6-sun/
export JAVA_HOME

as a new last line. (This method will also work if you wish to start and stop tomcat while logged in as root, but will only be picked up the next time you log in, not in the current session.) To make this value be set each time sudo is used, edit /etc/sudoers and add the line

Defaults env_keep += "JAVA_HOME"

after the existing Defaults line(s).

So now I need to install tomcat. The problem here is that the debian packages are now version 6, and Sakai 2.8 is not compatible with this version, despite an end of life date of September 2012. This is not the only problem, as according to http://www.crazysquirrel.com/computing/debian/servers/debian-tomcat-package.jspx, installation from the debian package is not recognised as valid by Eclipse, and this could well cause problems later if I want to use Eclipse for development - though I would be running Eclipse on my laptop, not on the server, hopefully. It's also worrying that the release notes for tomcat 5.5.35 indicate that it requires the Java JRE 5.0 by default, rather than Java 6 as recommended by the Sakai WIKI.

However, the strongest statement seems to me to be that Sakai 2.8 is not compatible with tomcat version 6. So I think that I'll need to install tomcat 5.5.35 from source. (The best option, given infinite time, would be to wait for the release of Sakai CLE 2.9, but my timetable does not permit that.) I'll follow the instructions on the crazysquirrel link already listed, as I can never keep the details of how to set up the Apache-to-tomcat connectors in my head.

Download the binary core distribution files from http://tomcat.apache.org/download-55.cgi?Preferred=http%3A%2F%2Fmirrors.ukfast.co.uk%2Fsites%2Fftp.apache.org%2F. The VM I'm using has been set up so that I can't connect from it to random sites on the Internet, so I download the file to my desktop and copy it to the VM.. I now have apache-tomcat-5.5.35.tar.gz sitting in my development space home directory. Actually installing tomcat is easy:

$ sudo mv apache-tomcat-5.5.35.tar.gz /usr/local
$ cd /usr/local
$ sudo tar zxvf apache-tomcat-5.5.35.tar.gz
$ sudo ln -s apache-tomcat-5.5.35 tomcat
$ cd

The symlink created in the last step is intended to make life easier: when upgrading tomcat, it shouldn't then be necessary to re-configure everything to point to the new location of tomcat.

As with java, system-wide environment variables should be set up. Edit /etc/bash.bashrc and add

CATALINA_HOME='/usr/local/tomcat'
PATH=$PATH:$CATALINA_HOME/bin
export JAVA_HOME CATALINA_HOME PATH

(The last line replaces the last line from the java installation step.)

Third step - set up mod_proxy_ajp. This is the simplest way to link apache and tomcat, though some people prefer mod_jk. mod_proxy_ajp is compiled into the debian apache2 package, but is not loaded. The same is true of the other proxy modules, some of which are needed for mod_proxy_ajp to work. To fix this, add symlinks for each proxy module configuration file from /etc/apache2/mods-available to /etc/apache2/mods-enabled:

$ cd /etc/apache2/mods-enabled
$ sudo ln -s ../mods-available/proxy* .
$ cd

Now configure mod_proxy_ajp. There should already be a connector configured at the tomcat end listening on port 8009 (look in /usr/local/tomcat/conf/server.xml to check). Apache will also need to be configured. I decided that access to Sakai should be via the URL /sakai, so my extra configuration looks like this:

  
   AddDefaultCharset Off
   Order deny,allow
   Allow from all

   ProxyPass /sakai ajp://localhost:8009/]
   ProxyPassReverse /sakai ajp://localhost:8009

This needs to go in /etc/apache2/sites-available/default between the last  and the ErrorLog directive.

Finally, restart apache:

$ sudo /etc/init.d/apache2 reload
Reloading web server config: apache2.

and start tomcat:

$ sudo /usr/local/tomcat/bin/startup.sh

The remaining component to the server environment (load balancing being unnecessary in the development context) which needs to be set up is the database. The Sakai 2.8 release notes give a choice of Oracle or MySQL, and in the development environment, MySQL is clearly the right choice. Run

$ sudo apt-get install mysql-server

and all the needed mysql packages will be installed, including the command line client. You will be asked to change the root password for the installation as part of the installation process, and at the end of it the MySQL server will be started.

Saturday, 2 April 2011

Installing Debian on MSi CR629 (Novatech I3) laptop

I recently bought a new laptop from Novatech, without any operating system pre installed (it turns out to be labelled an MSi CR629). I would, by the way, recommend Novatech as a supplier, particularly for people who want to buy computers which don't have Windows pre-installed. The directions I give will probably be considered a bit terse by a first time Linux installer, as I mainly want to explore how to obtain a working, Linux installation on this particular hardware, not to replicate other people's documents which describe how to install Linux of various flavours.

This post will describe the steps I went through to get a working Debian Linux stable installation on the laptop, for the guidance of any others who might wish to do the same. I might move to testing at some point, rather than stable; this is something I haven't decided yet.

I spent some time beforehand thinking about the Linux distribution to use. The short-list was Gentoo, Debian, and OpenSuse. I rejected ubuntu, which I have used for a long time on my desktops, because I don't like some of the recent changes and the direction the project seems to be going in, in terms of user interface design and flexibility. I ended up rejecting Gentoo, after actually attempting an installation; I have in the past spent too much time manually configuring Xorg.conf, and I have no desire to do so again. I never got round to trying OpenSuse...

1. Create CD and Install Debian Linux

I did this on one of my existing computers. I downloaded via the Debian website, and burnt a CD using brasero on my existing ubuntu desktop. Then I booted up the laptop, inserted the CD, and rebooted, following the instructions on screen. The network install works fine, though it must be done with a wired internet connection (see below on how to add wireless support).

I chose to partition manually, though there is no particular need to do so. This was mainly so that I could leave some empty space on the disk, possibly for installing Windows later, possibly for exploring other Linux distributions. But I created a small /boot partition, a larger than recommended swap (as I've had problems in the past from too small swap space), and a large / partition (as I have also suffered from using machines which had many partitions which did not work out as the needs of the server did not match the ideas of the installer).

Once the installation process is complete, follow the menu item to restart, remove the CD, and let the machine boot from the hard drive. With the exception of some hardware accessories, this process worked fine.


Some hardware problems will only become apparent over time; there are several pieces of kit integrated into the laptop which I have not used yet, and even some which I am unlikely to ever use (the MMC card reader). A couple of items did immediately need fixing to work with Debian, and this is probably the most technical requirement of the installation.

2. Wireless networking


The laptop comes with RaLink RT3090 wireless hardware, which has known issues with linux drivers. But before we come to that, the device is bizarrely switched off by default. If you press Fn and F8 simultaneously, wireless networking is turned on, and the status light second on the left below the mousepad should become green.

Next, install the basic wireless software. Open a terminal, and as root or using sudo, run

# apt-get install firmware-ralink wireless-tools


(Using synaptic is of course an acceptable alternative.)  Enable the drivers by restarting the network manager, either by rebooting or


# /etc/init.d/network-manager restart


The software package named firmware-ralink contains several drivers, some of which will work with the RT3090 hardware, but none of which allow stable wireless connections. They are however needed to establish a connection. For a more stable connection, download the proprietary driver for the RT3090 directly from Ralink's support website. You will need to accept the license, entering name and email, to download. To install, you will need to be root or use sudo.

# unzip 2010_1217_RT3090_LinuxSTA_V2.4.0.4_WiFiBTCombo_DPO.zip
# cd 20101216_RT3090_LinuxSTA_V2.4.0.4_WiFiBTCombo_DPO
# make
# make install

(The original text here included a link to a website where a .deb file could be downloaded; I hadn't taken in that this was ubuntu only and would not work in debian.)

Rebooting is probably the easiest way to see if the driver is picked up. You can see a list of which drivers are loaded using

$ lsmod | grep -e rt2 -e rt3

(you don't need to be root to run this). If rt3090sta is not listed, you need to add it (as root):

# modprobe rt3090sta

This immediately got the wireless working, searching for networks to connect to, and with a reasonably (but not perfectly) stable connection.

To force the driver to be loaded on booting the laptop, run the following command as root:

# echo "rt3090sta" >> /etc/modules

This simply adds the module name for the driver to the list in this file of the kernel modules to load on boot. (N.B. This does not always appear to work, but if not, run the modprobe command again to load the driver manually.)

(These instructions are based on those here, which although they didn't work for me as written, gave enough clues that I could get wireless working.)

3. Integrated card reader

Inserting an SD card into the card reader (second drawer from the front on the left hand side; you need to remove the cover first) does nothing. This is because the driver for the reader is not included as a module for use with the current linux kernel - there is a kernel bug report, but it is complicated and confusing in its advice and in fact easier to follow instructions are available elsewhere. The card reader is a USB device, and can be seen with

$ lsusb

The output should include a line like:

Bus 001 Device 005: ID 0cf2:6250 ENE Technology, Inc.

which indicates the manufacturer of the hardware. These instructions are intended to get card readers made by this manufacturer to work in debian linux: if the hardware for the laptop has changed and a different card reader is included, the method will be different.

You will need to be root to install the driver, which needs to be compiled as a kernel module.

First, download the driver here. The downloaded zip file needs to be unzipped to a particular location:

# unzip -d /usr/src/keucr-0.0.1 R100_02_ene_card_reader.zip

Create a file named /usr/src/keucr-0.0.1/dkms.conf containing:


PACKAGE_NAME="keucr"
PACKAGE_VERSION="0.0.1"
CLEAN="rm -f *.*o"
BUILT_MODULE_NAME[0]="keucr"
MAKE[0]="make -C $kernel_source_dir M=$dkms_tree/$PACKAGE_NAME/$PACKAGE_VERSION/build"
DEST_MODULE_LOCATION[0]="/extra"
AUTOINSTALL="yes"

and then use dkms to build and install the driver:


# dkms add -m keucr -v 0.0.1
# dkms build -m keucr -v 0.0.1
# dkms install -m keucr -v 0.0.1
# echo "keucr" >> /etc/modules

The last line means that the module will be loaded on boot. To load it manually in the current session use:

# modprobe keucr

Test by inserting a card; it should now be recognised and automatically mounted. Whenever a new kernel is built/installed, this driver will break and will need to be re-installed:

# dkms remove -m keucr -v 0.0.1 --all

# dkms add -m keucr -v 0.0.1
# dkms build -m keucr -v 0.0.1
# dkms install -m keucr -v 0.0.1


# modprobe keucr

4. Mousepad tapping

Not everyone likes mousepad tapping (that is, being able to tap on the pad to simulate a mouse button click, rather than using the bar at the bottom of the pad), and it is turned off by default in gnome (the default windowing environment in debian). Enabling is much simpler than the preceding tasks. To enable, simply use the menu at the top of the screen; select System/Preferences/Mouse, go to the Touchpad tab, and click on "Enable mouse clicks with touchpad". This should take effect immediately.

5. Webcam


Like the wireless hardware, this is switched off by default. I spent a while trying to work out what the problem might be, before turning it on, which can be done by pressing Fn and F6 simultaneously. When you do this, you should straightaway find:


$ ls /dev/video*

returns

/dev/video0


and that you can see yourself if you start the application cheese (select Applications/Sound and Video/Cheese Webcam Booth). Additionally, lsusb will now return an additional entry which includes the manufacturer's name: "Acer, Inc".

You can turn the webcam off again with the same key combination.

Update: Fixed some errors in the wireless networking section.
Update 2011-10-13: Updated URL for Ralink Support.